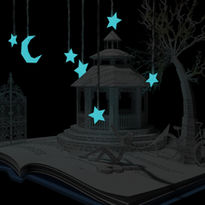
Final Renders
Paper Prototypes

I initially made a paper version of what I wanted to portray to visualize the placements and proportions of each aspect.
Inspiration & References
I was most inspired by The Little Prince which is a French children's book that was also made into an animation. My goal was to emit the feeling of childish wonder and mystery. I modeled the pavillion, stars, and tree based off of reference images.
Modeling Process

Presence Maps
To decrease the number of polygons used; I used presence maps for details and objects that weren't the main focus such as the gate, branches, bike, and pavillion designs.


Subdivision Schemes


I found that rendering low poly objects with the Catmull-Clark sub-div scheme to be very useful for objects, such as the book pages, where I needed a smoother render without having to use the Smooth tool or add more polys.


Look Development
UV Mapping
I haven't had much experience UV mapping before, so that was definitely a learning experience. After watching some online tutorials and figuring out how to modify UV shells, I was able to properly apply textures. It was difficult adjusting the UVs to have a uniform look throughout each asset, but I learned a lot through the process
Textures
Lighting
I linked lights to the details and areas that needed to be further highlighted.
I went through multiple options to make the stars glow including using a Mesh Light and placing a Sphere Light inside each star. In the end, I found a Glow option under the shader. This allowed the stars to keep the texture and be uniformly lit, unlike the other methods.


